Detached dropship turret
Posted December 27th 2013, updated later
Associated movies
- BCM88 - Heroic; Early tries and first success (6:34)
- BCM98 - Heroic; Setting up with late prep (5:54)
- BCM99 - Heroic; Detachment technique (5:46)
- BCM111 - Heroic; Doing without the bridges (6:25)
- BCM124 - Heroic; Mid-air ramming (6:54)
- BCM126 - Heroic; Ramming better and higher (8:13)
- BCM127 - Heroic; Banshee pick-up (8:15)
- BCM128 - Heroic; Bumping around (5:33)
- Introduction
- Preliminary save - early prep method
- Preliminary save - late prep method
- Setting up a detachment attempt checkpoint
- Getting your detached turret
- Doing without the bridges
- Getting a subsequent checkpoint
- Turret play
- Mid-air ramming and blasting
- Banshee pick-up
- History and links
Introduction
Now here's something weird. In Assault on the Control Room it's actually possible to get the turret of a covie dropship detached - and amusingly it turns out to have a life of its own, and can still shoot at you!
This was something discovered by BigGruntyThirst back in 2006, which I was recently reminded about when KreativeKill posted some video. I got to work exploring the whole business for myself (a mere seven years late, hey-ho), and in this article I'll detail set-up procedures and detachment technique, as well as the matter of playing about with the turret. Plus there are some links at the end.
Overview of the action
The dropship involved is the one which deposits troops in the spiral path area. Basically you fly past it and wait for it in the twin bridges area, where you bail out of your Banshee just before colliding with it and pressing X to 'flip' the dropship. Yes, it strangely has the ability to get flipped! If all goes well, the flip causes the ship to level out for a while, which in turn causes it to scrape against the cliff and shed its turret; and meanwhile you bounce away to hopefully survive a landing on one of the bridges - typically the first - or possibly elsewhere.
Then you can go and play with turret, which fell to the ground. If you landed on one of the bridges, you can fly down in a Banshee you prepared in advance. You can't reliably use the lift or the turret may vanish.
Preliminary save - early prep method
The first thing to do is create a save in which you've prepared some Banshee transport on the twin bridges, and in which you're ready to trigger the spiral path Marines, with full health. This will be the basis from which you can proceed to get a detached turret. There are a couple of ways to achieve such a save, but I'll start with one in which you prepare the transport early, after doing a bridge descent at the start of the level.
In regard to difficulty levels, feel free to use Easy for minimal enemy threat, but be aware that this will also minimize the aggressiveness of the detached turret.
Prepare your bridge transport
Descend from the level's first bridge and travel to the twin bridges Banshee. Then fly to the tower Banshee, blast or push it down to the ground, and switch to that (or as a quicker way of achieving the same end result, switch to the tower Banshee where it originally stood, after letting your first Banshee skim over the edge to the ground).
Fly to the twin bridges and position your Banshee where you want. There are two sensible options. One is to put it on the first bridge - the one you're considerably more likely to impact. Specifically I'd recommend the corner on the near side of the door, as that's often where you'll land. It may help cushion your fall, and sometimes you'll be able to board it almost instantly. After safely dismounting close to the cliff wall (don't get yourself squashed like a fool), you might like to melee it back against the wall, because often you'll be skimming down the wall and it could thus help cushion you (though it probably wouldn't make much difference).
The other option is to make it straddle the bridges so you can board it directly from either one. To arrange this, rest it on the transparent panels with the rear against the cliff, except have it at a slight angle so you dismount onto the first bridge (as seen in the pic). With this arrangement you should be able to board from either bridge by jumping up to get the prompt; and a small extra benefit is that the Banshee may occasionally prevent you falling through the gap. Even if you later find that you can't get a boarding prompt on the second bridge (maybe you got the angling wrong), it'll be pretty easy to blast the Banshee your way by tagging its far side.
Of these two positional options, I'd recommend the first. Aside from being easier to set up and giving you handier Banshee access in most cases, you'll probably only rarely land successfully on the second bridge anyway (compared to the first), making the value of direct Banshee access there quite minimal. And if you do land there, you can always attempt to jump across, as described later.
Head inside, bring up the lift, and ride down to get back outside. Board the nearby Ghost (one of two which Elites are scripted to use) and return to the earlier Banshee.
Resume normal play
Fly back to the level's first bridge and resume normal play. As you play through, keep the Banshee with you and in decent shape, or swap it for the platform Banshee and keep that in decent shape.
For the eventual play in the twin bridges area, preferably acquire a sniper rifle as the 10x view can be useful, not to mention its killing capability. I suggest also having a pistol, or a rocket launcher if you prefer, plus it's nice to be topped up with grenades just in case you want them. If your weapon is clip based, be sure it doesn't need reloading, else you'll keep doing an irritating involuntary reload later when hitting X to flip the dropship. Most importantly though, be sure to have full health to help you survive falls.
Feel free to bypass lots of enemies as you head through the level, towards the narrow pass leading into the spiral path area. You could actually fly straight past everyone if you're in a rush, but a spot of sniping can be worthwhile in places to keep your Banshee healthy. It's fine to skip the trigger for the crashed Pelican area, in which case you'll also get no covies in the two-Wraith area. In the tower area though, you'll need to trigger enemies by being sufficiently low down. Also, in that area I recommend eliminating most troops you see, else their growing number can lead to framerate slowdown, which can manifest even when you've later moved into the twin bridges area. I'd also recommend killing the covies in the preceding rising tunnel, as they'll otherwise give chase and could bother you.
Finish off with the pass checkpoint
Preferably after making the pass safe, trigger the pass checkpoint (e.g. by flying low though the pass), but preferably keep it delayed until you've cleared the covies who spawn beyond, plus any pursuers. Avoid triggering the Marines yet (stay back from the Marines trigger line near the edge; or more precisely, stay out of the trigger zone). When you've got things cleared, get the pass checkpoint and save.
Optional advance work
During the transport preparation phase, there are some extra things you can do if you like. Namely, overturning Shades and Ghosts and destroying the tower Wraith, in order to reduce the enemy threat you'll face when playing though later, or to reduce the threat which in some circumstances you might face after detaching the turret. Worth doing, and it takes very little extra time.
A point about the twin bridges Banshee
Notice that you didn't use the twin bridges Banshee as your bridge transport. You could have, but here's the thing. If you later let enemies spawn in the twin bridges area (there are reasons why you might) and that Banshee is unmanned, the pilot will teleport to it, and will take off if it's upright. Obviously not good if it was meant to be your transport! If you're definitely not going to let the pilot spawn before getting a detached turret though, it would be ok to use it as your bridge transport.
Preliminary save - late prep method
You can just as easily create a preliminary save without using a bridge descent at the start of the level. It just means preparing your bridge transport later than before. I'll cover that now, assuming you've read the above so I can just concentrate on how things differ. You can see this method used in BCM98.
Steal the platform Banshee and reach the tower area
Play through the level as normal until able to steal the platform Banshee. Once you've got that, things become like before for a while, progressing through until you reach the tower area.
Prepare your bridge transport
After preferably pausing to kill off the dropship troops and any pursuers, trigger tower troops at the front entrance, and wipe them out. Some covies also spawn beyond (a Wraith pilot, two Ghost pilots, and a Shade Grunt around the back), and you could either kill them now or take care of them later when you return to this area.
There are supplies outside the tower if you want them (I'd usually top up my sniper rifle there and get a pistol). After that I suggest overturning the tower Banshee or switching to it. That's to guard against getting attacked by it later, and maybe you'd like a fresh Banshee too!
Skipping the pass guards trigger (just stay sufficiently high), fly to the twin bridges and position your Banshee as transport, then use the lift. At the bottom, hit the switch to send it up without you. As you leave the lower room, Elites and sleeping Grunts will spawn in it and some music starts, but it quickly stops because you sent the lift up (the game thinks you headed up to the bridge). It was good to stop it, else it would eventually overlap the dropship music.
Finish off
Go outside and board the twin bridges Banshee, then head back to the tower area. After maybe mopping up remnant troops who could bother you, trigger the pass guards (Hunters and potentially two Elites) and resume normal play. From here, things are the same as in the early prep method.
Options as before
As with the early prep method, there's also some optional advance work you can do along the way if you want, disabling covie hardware.
Alternative trigger skip
Instead of skipping the pass guards trigger to prepare your bridge transport, you could skip the earlier tower trigger. But the drawback is, you won't have access to the supplies outside the tower, as they seem to get removed once you've triggered the sleeping Grunts.
Double Banshee transport
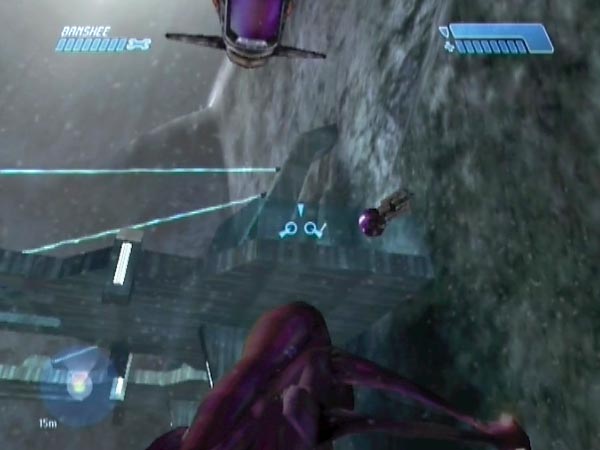
Partly to keep things nice and simple, my plans provided just a single Banshee as transport down from the bridges. But if you don't mind a little extra work and complication, there's no problem arranging for two, such as shown in the picture, affording extra convenience. I think that would especially be worthwhile if you're interested in getting a detached turret multiple times, because then you'll be doing a lot more landing on bridges, so it makes sense to have the handiest possible transport facilities. But you can decide for yourself. Here are the details.
Using the early prep method
If you're using the early prep method, here's how to modify the work, starting from after you've positioned the tower Banshee on the first bridge and returned to the twin bridges Banshee you left near the tower.
Fly to the platform Banshee and blast it down. Switch to it and return to the twin bridges, but preferably keep the tunnel checkpoint delayed, to get a safety checkpoint on arrival.
Position the Banshee as desired. You could either have it on the second bridge, or straddling both. The virtue of the straddle is that the Banshee can also stop you going through the gap later on. Take your pick.
If you're on the second bridge after this, you now need to jump to the first. One way is to first jump up onto the lowest part of the transparent panelling along the edge, doing a crouch to get extra clearance. That's quite risky even if you've practiced it, which is why you'd want the safety checkpoint. Once you're up though, there's little danger. Just run along the edge and jump.
An easier way is to take a running jump off the top of the Banshee, if it was suitably positioned on the bridge. One good option is to have it pointing into the back corner. During your jump, you can potentially bounce off the cliff. Another option is to back it into the corner. If you dismount while keeping the Banshee forced backwards, you end up on top, ready to about-face for the easy jump. Or, with similar positioning you could dismount slightly away from the corner, then clamber up for the jump. With all these Banshee hop methods you could forego the safety checkpoint really, if you know what you're doing.
Once on the first bridge, go down in the lift again, and take a Ghost ride back to the Banshee you left at the platform. Then resume normal play as before.
Using the late prep method
If you're using the late prep method, here's how you can modify the work, starting from soon after the cavern.
When you trigger tower troops, preferably delay the associated checkpoint, to use as a safety checkpoint shortly. After doing some killing, fly up to the tower Banshee and blast it down, to fetch later.
Continue to the twin bridges and position your Banshee as your extra, in the sense I described for the early prep method (i.e. put it on the second bridge or straddling both). You can use your delayed checkpoint as a safety checkpoint in case anything goes wrong (this 'extra' being the trickier one to arrange).
Go down in the lift and send it back up, then get a Ghost and return to the tower Banshee.
Position it on the first bridge, then go indoors to use the lift again; it'll already be on its way up. Bridge troops will spawn behind you as you leave the bridge. That happens because you've spawned the lower room and have now hit a trigger in the upper room's exit passage - so the game thinks you're heading for the bridge.
Back outside, board the twin bridges Banshee and clear the bridge troops, at least on the near halves of each bridge. Preferably also take care of a cloaked Elite (or two) who'll spawn when you get near the second bridge's door, else he could attack you later. If you hover near the door you can blast him the moment it opens. Actually, you could also have dealt with some or all of the bridge troops when still up there (and bear in mind that on your way to the lift, you'll find supplies including pistol ammo and three frags, plus a medkit). After this, continue like before.
Setting up a detachment attempt checkpoint
Using your preliminary save, it's now time to get a checkpoint in the twin bridges area, from which to make attempts at turret detachment. In order to maximize your attempt rate, it's good to have the checkpoint just as the dropship is coming into view, or thereabouts (it depends a little on your position and subsequent technique). That's pretty easy to arrange, though it may take more than one try because your control over checkpoint delay isn't total. You can see me using the basic routine in BCM99.
Basic routine
Have a seconds timer handy, and as you cross the Marines trigger line, start delaying the associated checkpoint. Sink down towards the ice. When you get low the dropship will be triggered along with some music (it's triggered when you get down to a certain low height anywhere in the spiral path area). Glance at the trigger time.
Fly to the twin bridges area and get your Banshee positioned in a good place from which to begin each detachment attempt. I suggest having the Banshee backed up against the support beneath the start of the first bridge (the bit which sticks into the cliff face), but that's not critical at all and you could use some other position if you prefer. You'd want to be somewhere towards that general area though.
On PAL Xbox, the dropship will come into view about 46 seconds after it was triggered. I'm not sure if it's the same on NTSC/PC, but you can easily check. I suggest trying to get the delayed checkpoint just as that's happening, or a few seconds earlier if you want to be safer or have more opportunity for varying your detachment technique. Taking into account the flight time of your delaying plasma, and the fact that the game will probably delay an extra few seconds after it expires, do the appropriate subtraction to decide when to stop firing (e.g. subtract maybe 6 seconds from the appearance figure). Hopefully things will turn out close to what you want. But if you're not satisfied, just try again. You'll need to eject and reload the disc if a checkpoint was granted.
Note: Sometimes the game may not grant you the checkpoint soon enough after your delaying ends. Based on some testing, I think that's down to the presence of Marines in the spiral path area. They may be engaged in combat which is keeping the checkpoint delayed. If you want to eliminate the Marines to remove this possibility (or just because you don't want them around for your later fun with the turret), that's easy to do by scything them down on the ice before you proceed into the twin bridges area.
Music elimination routine
The way I just described things, you'll still have the dropship music playing. If you prefer however, you can set things up so the music has stopped - which would save you hearing it over and over as you make repeated tries to detach the turret (although, I can say that the music has never irritated me personally).
Trigger the Marines as before, except this time there's no need to delay the checkpoint; you won't need it. Don't drop to the ice either. Fly over the underpass (the short tunnel at the end of the ice), to land and dismount on the exit side.
Just as you're near the exit, the dropship will trigger, so note the time. Go into the underpass as far as the rock which stands in the middle of the path. By that point you've gone far enough to spawn a cloaked Elite guard (or two), and this will also allow later covies to spawn. You might want to kill the guard, or he could give you a nasty surprise in the twin bridges area later. Be sure to retain full health of course, and if your weapon is clip based, reload.
Reboard your Banshee and fly low over the short zigzag path, triggering further covies. When you now fly low past the big tree ahead, or anywhere roughly level with that, you'll trigger more troops (including the Banshee pilot and Ghost pilots), and the dropship music will soon come to an end. In addition you trigger a checkpoint, and that's the one to now delay.
There's potentially time to kill some of the covies if you want, before getting into position to end your checkpoint delaying as before. But there's no particular need. As long as you're reasonably high up, no covies would be near enough to prevent you getting the checkpoint.
However, stay clear of the door beneath the twin bridges, to avoid triggering the door checkpoint yet. This way you'll be able to get it later, after obtaining a detached turret.
Getting your detached turret
Ok, so you've got your detachment attempt checkpoint. Now I'll talk about how to get the turret off and survive so you can play around with it. You can see detachment technique demonstrated in BCM99.
The general picture
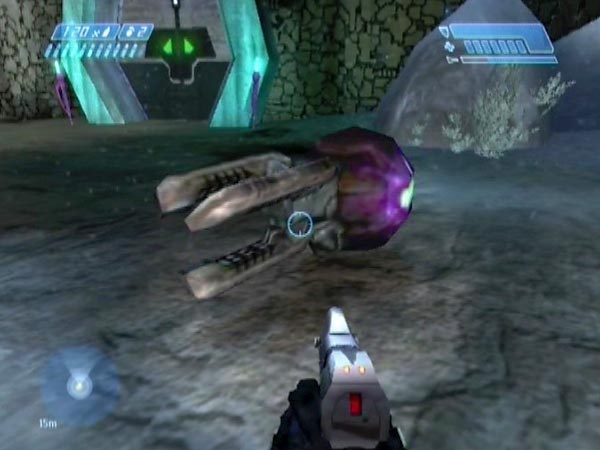
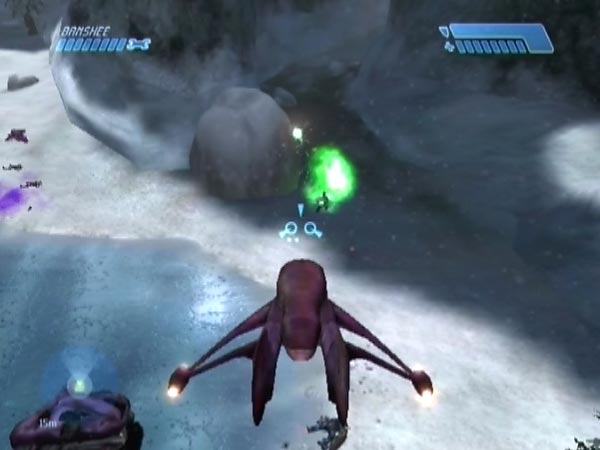
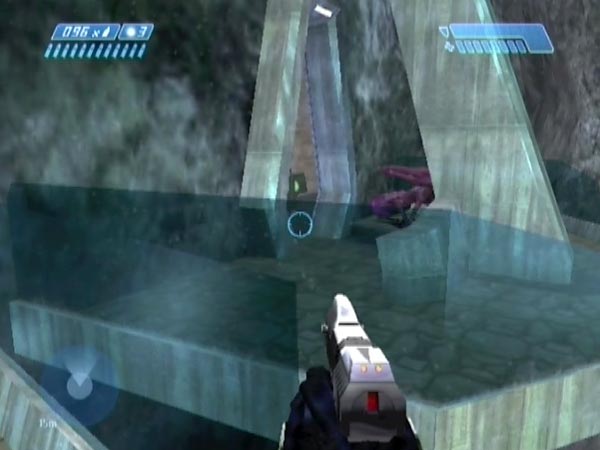
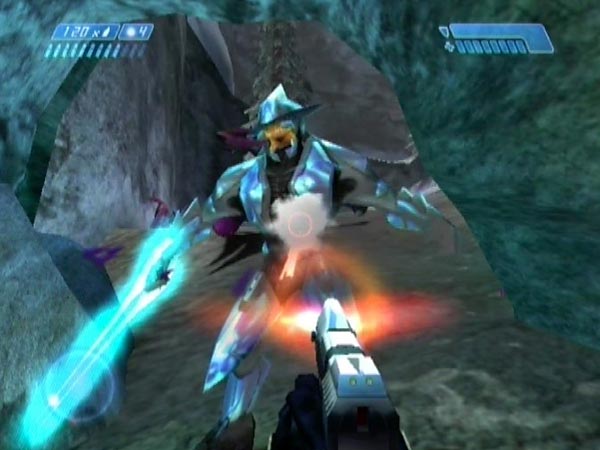
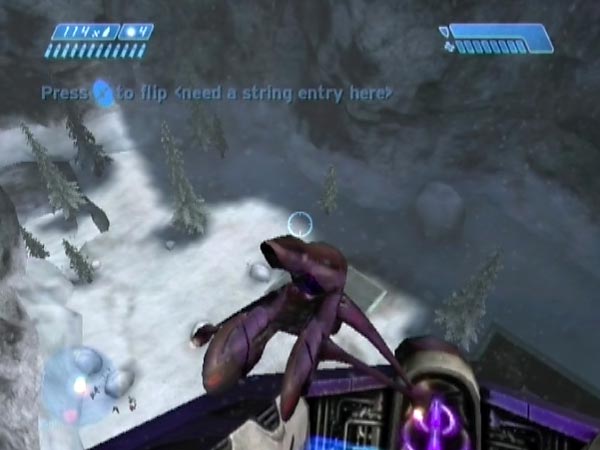
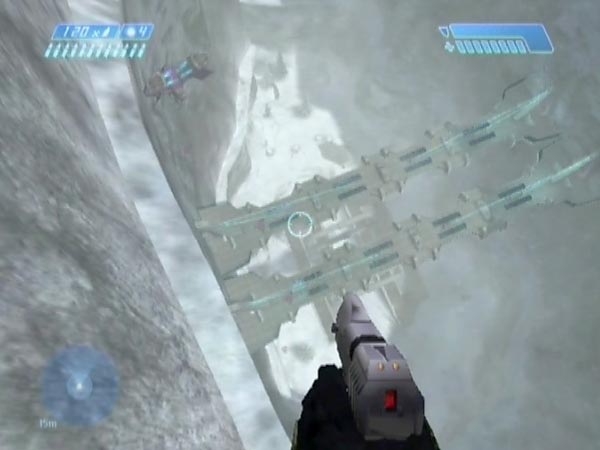
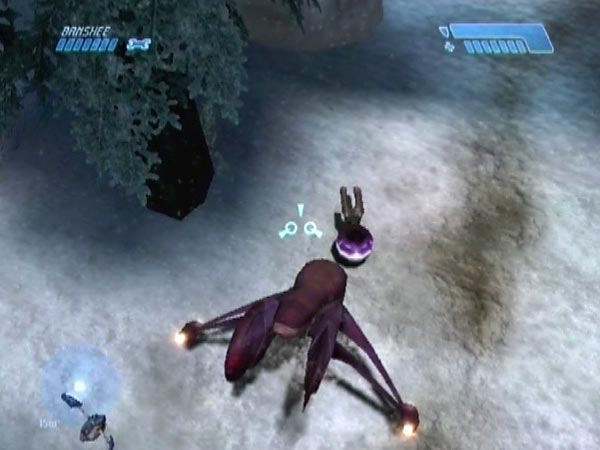
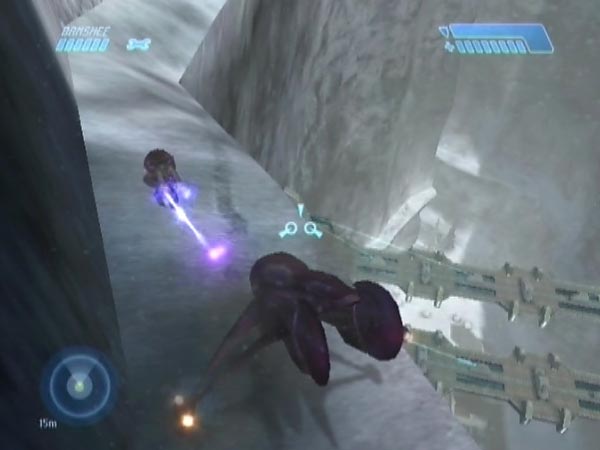
The dropship is scripted to follow a curving and rising path which takes it up surprisingly close past the cliff on the near side of the first bridge, and it'll blink out of existence a little later. When it's sufficiently far from level, you can get a prompt if you're close and no longer in your Banshee. On the Xbox it says "Press X to flip <need a string entry here>". If you do it, the ship briefly levels out to some extent, causing it to end up closer to the cliff than was scripted. So close that it may scrape against a protruding part of the cliff and shed the turret, which then falls to the ground. In regard to the shedding, the turret sometimes gets 'bumped' into a new position, such as seen in one of my intro pics.
It's rather curious as to why the flip potential is in the game, but evidently Bungie weren't expecting you to be in a position to access this control. If you're wondering, the bit about "need a string entry here" is a reminder to the development team about something that still needs doing. It says there's a name missing. Perhaps it would've been 'Dropship' or 'Spirit' if the feature had been fully implemented.
Technique
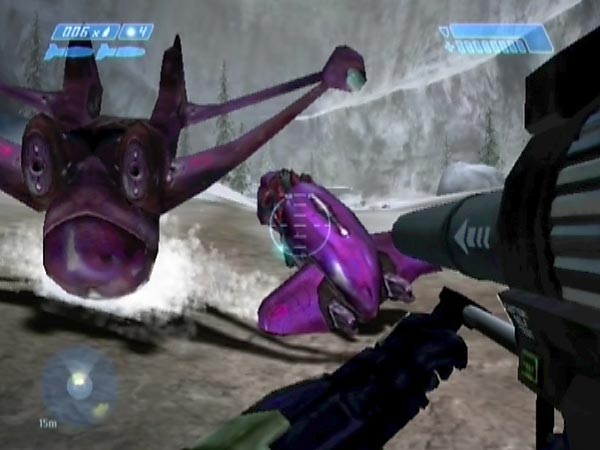
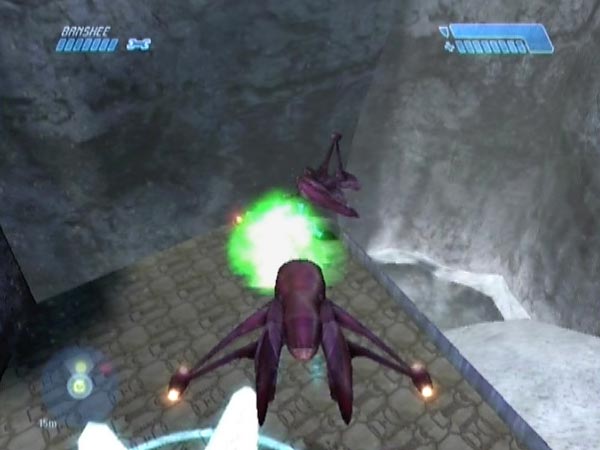
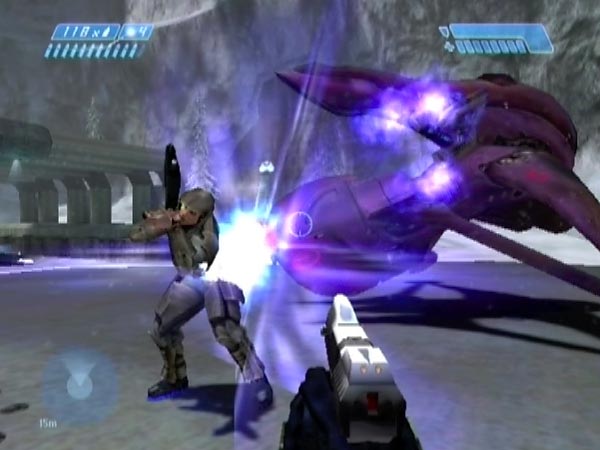
Let's get to the actual technique then. If you positioned the Banshee where I suggested, start off on your intercept course when the dropship is coming into view, or thereabouts; you could vary the timing by a few seconds either way I think. Aim the Banshee to hit near the centre of the ship, and press the dismount button just beforehand. Specifically, I recommend pressing just as the front of the Banshee is reaching the front end of the dropship.
If things go well, the Banshee bounces back off the ship and gives you a shunt, which you can take because you only just dismounted (you've got temporary immunity). You might get deflected off the ship sides too, but primarily you're getting shunted by the Banshee. Hopefully the dropship flip prompt will appear, which you need to act on. As it's usually quite fleeting, it's perhaps best to just be mashing the X button as soon as you dismount. But things can also be done by simply waiting for the prompt then reacting.
Hopefully the turret ends up detached, and you end up alive on one of the bridges, or possibly even on the lower ledge or on the ground (more about that later). To improve your odds of survival, you can drift a little in the air, which could help you hit a higher or sloping surface; and also you can crouch as you hit, to soften the blow.
Also while in the air, you may get a chance to see whether the turret has come off or not. If it clearly hasn't, you can revert without further ado. A detached turret also shows up on your tracker as a small red dot separating from the larger dot of the dropship, so that's another way of verifying detachment. There's one other clue you can get too. If you alert the dropship by firing sometime before you collide, it'll retaliate for a while. But the turret is seemingly unable to fire when detached and falling; and therefore if you're still hearing or seeing fire at a time past which the turret would've detached if at all, you'll know you've failed. That said, I'm hesitant to recommend firing as it may slightly interfere with your concentration on approaching the ship well.
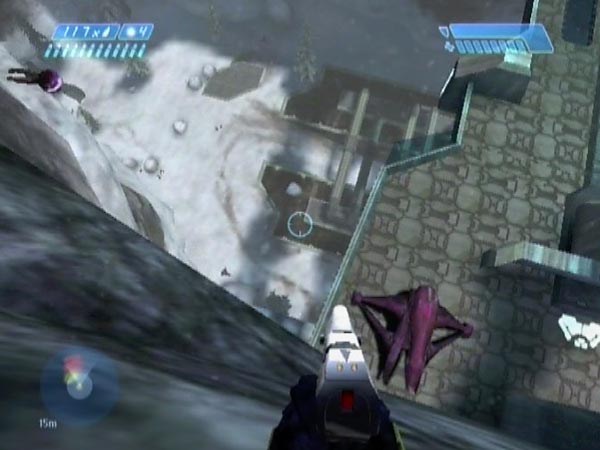
If you land on a bridge as planned, you can fly down to the detached turret if any (going inside to use the lift would be a bad idea because the turret might get removed by the game). If you land on the second bridge but have no transport there (and the Banshee you were flying doesn't happen to land there with you), you can attempt to jump across to the first via the transparent panelling as described earlier.
Success can take many attempts, as you might expect. For starters the flip needs to occur within a certain short window along the ship's flight as it's starting to climb, else it won't scrape the protruding part of the cliff face (a particular area you'll get to recognize). Your dismount needs to be well timed too. If you bail too early, you can expect to get hit by the dropship and either die instantly or be interestingly slowed, to then fall to your death. If you bail too late, you might not see the flip prompt at all, because you're too far from the dropship by the time you're out. Even if you get the timing right, you might not get the flip prompt. But the biggest problem is survival. The bounce is hard to control (even hitting the ship centrally is a task), making your trajectory a bit of a lottery.
Take heart though. With experience, success can be a matter of just a few minutes work. During a half-hour test once, I was able to end up face to face with a detached turret 13 times, averaging just 11 attempts per success. That shows what's possible when you're in the groove.
Note: The turret sometimes gets pushed through the cliff wall by the dropship. So if you ever catch a glimpse of it coming off yet can't find it later, that's probably what happened.
Doing without the bridges
Landing on the ground or lower ledge
In what I've written thus far, the focus has been on surviving the dropship bounce by landing on a bridge. However, I've found that ending up on the ground or on the lower ledge is also very viable, at least on PAL Xbox (I'm not sure about NTSC/PC, because of the lesser fall distance you can tolerate). You can see a variety of examples in BCM111 (not all of which were intentional, but that doesn't really matter).
There are two things to adjust in the detachment technique. Firstly, preferably hit the dropship a bit earlier in its trajectory, before it's got too high - though you do still want it to've started climbing. And secondly, preferably hit below its centre, so you tend to bounce off at a lower angle - maybe even downwards.
There are various outcomes, but one quite common one is to end up skimming around the cliff face above the ledge, to eventually either come to a halt on the ledge or to skim off and down, where you can be cushioned by friendly sloping rock at the base. That's actually how I got my first success, shown in BCM88. I didn't even take any shield damage - until a welcoming party starting shooting at me. If you triggered covies in the twin bridges area, obviously you should be alert and ready to deal with any attack.
Landing on the near part of the ledge (i.e. not far from the door) is another very viable outcome. In one freaky example seen in BCM111, the turret actually ended up bouncing off me and stopping on the ledge.
Or maybe the ledge won't feature at all. Perhaps you'll just shoot across the battlefield and get cushioned by the cliff base. Another thing I've experienced multiple times is being sent down towards the pipe structure in the middle of the battlefield, to get cushioned by a pipe.
Incidentally, a nice thing about landing on the ground is that you can potentially be there to see the turret falling down and hitting the ground. One time, as seen in BCM111 where I hit the pipes, I was able to see it land just a few metres away. It stopped abruptly; no bouncing.
Using mid-air reboarding, woo-hoo!
Yet another option is to reboard the Banshee in mid-air, something I didn't initially realize was a possibility. There are five examples at the end of BCM111 (the first was unplanned but the rest are deliberate). Doing mid-air reboarding is likely to take a bit of practice to get the knack of, but it's actually not too hard, and a nice benefit is that you can potentially be near the turret as it detaches and falls (and you might enjoy trying to blast it with a fuel rod shot on the way down).
The main way to do it is to try and get the Banshee briefly supported above the top of the ship long enough for you to be able to reboard - possibly after having to flip it. I advise mashing the X button for this. That's always how I've done it. In order to have enough time, I think it's a good idea to get the Banshee slowed up beforehand, so the ship will be underneath for longer. In two of my examples I actually about-face the Banshee beforehand, and by the time the ship is underneath, I'm either holding position or starting to go the same way as the ship.
The first reboarding example in BCM111 is different because the Banshee hits the back of the ship as usual. Nevertheless it was apparently supported well enough for me to reboard. That was pretty freaky I think.
Simplified set-up
Needless to say, employing any of these methods would mean that you can skip the business of arranging Banshee transport on a bridge; so things would be simpler. Possibly you might even find it easier to get your detached turret too. At this point I'm not sure about the comparative difficulties, but I'd especially recommend trying to pull off some mid-air reboarding, which is pretty good fun in its own right.
Important update, with the release of BCM126
During my work on BCM126 it became clear that mid-air reboarding is by far the best way to get a detached turret, if you use a good initial Banshee position such as seen in that movie. Or at least, it is for me. There's a good chance I'd have it within just a few tries, and quite possibly even first go. That's radically better than when I was using the old method, often taking several minutes to achieve success. At some point I may rewrite this article with this new knowledge in mind - and also I may make a tutorial. Besides which, with mid-air reboarding you also get the benefit of being able to try ramming the turret in mid-air, something you can have a whole lot of fun with, as I did in that movie (and earlier BCM124).
Getting a subsequent checkpoint
Once you've got a detached turret to play with, you might want to get a checkpoint, either to save things for later or so you can play around repeatedly. This is a good idea because the turret can get pushed through the scenery and lost (if you try to move it), or get terminally frozen, or get removed by the game, depending on what you do.
For the basic routine
If you used the basic routine for setting up a detachment attempt checkpoint, you can simply fly back to trigger the underpass checkpoint - as seen in BCM126. And of course, you can delay it for as long as you like with Banshee fire. To finally get it you'll need to be clear of the turret's threat. Either be suitably distant, or briefly hide (e.g. behind a nearby tree if on foot). Covies won't spawn in the twin bridges area yet, as long as you avoided going through the underpass. Marines will follow you into the twin bridges area if you give them the chance.
Another way of doing things is to head back to the underpass exit and go in far enough to trigger a cloaked Elite (or two). You'll also now be able to trigger further covies (warning: if the twin bridges Banshee is unmanned and upright, the pilot will teleport to it and take off), and eventually there's a checkpoint triggered near the door under the twin bridges. Keep that checkpoint delayed until you've got rid of all potentially bothersome covies, then get it. You can see all this demonstrated in BCM99. At that time however, I'd somehow overlooked the simpler option of merely triggering the underpass checkpoint; otherwise I probably would've just done that. You don't need to go through the work of triggering and killing covies.
For the music elimination routine
If you instead used the music elimination routine, you don't need to go back to the underpass. The door checkpoint is ready to be triggered, nice and handy. That said, you may nevertheless want to kill off earlier covies first, to make the whole area safe.
Turret play
So, now you've got your detached turret, how does it behave and what can you do with it?
Shooty cutie
The detached turret rests slightly above the ground and is able to rotate to fire at you. Its aggressiveness varies with difficulty level, just as you might expect. I haven't done any serious analysis of that, but when I checked things on Easy, the turret was noticeably more reticent about firing compared to Heroic. On Easy you'd barely have anything to worry about, damage wise. You can be standing at close range and it'll still be missing with most of its shots. Regardless of difficulty level though, the turret won't fire if you stand sufficiently close - just like with a manned Shade. While airborne the turret seems unable to fire, though it can certainly turn to face you.
Interestingly, the game seems to treat the turret as personnel, in various ways. For one thing, Marines will potentially recognize it as an enemy, though they don't actually fire on it. For another, if a Grunt is firing at you but hits the turret instead, he may give a friendly fire line such as "Move!" (see BCM312 around 1:20) or "It wasn't me". Also, in my movie BCM128 which showcases the turret's impressive bumping ability and general twitchiness, you can notice the door opening or closing according to the turret's proximity (it's not caused by myself, while I'm in the Banshee).
Awareness
When you arrive at the turret, it may not be aware of you at first - something you'll soon notice because it doesn't turn to focus on you, even when you enter its field of vision (it might initially be facing away of course). Instead it just looks around, which is kind of cute. You can always fix that if you want, by firing a shot or by throwing a grenade and waiting for the bang. If you throw a grenade, it'll turn to look at where the bang went off, and then it'll face you. Brushing against the turret makes it turn but doesn't restore awareness. Nor does meleeing the barrel.
If it's aware of you, you can always make it lose awareness, which can be useful. One way is to hide for a while. In my tests on Heroic, 40 seconds hiding always sufficed. Another way is to go to a sufficiently different area then return; e.g taking a quick flight to the spiral path area and back.
Barrel waving
If you get very close to the turret, it starts waving its barrel around. That can take the form of small oscillations or big horizontal swings, and some vertical swinging is possible too. This is quite cute and amusing, and one of the best things to play about with. Experiment with distances and crouching. You can also make it wave about by standing on top.
Freezing the turret
Shooting the turret doesn't seem to do any damage, and it likewise seems unaffected by explosions, not even getting moved by the blast (you can cause needle explosions on it too by the way). Also, your reticle doesn't go red over it. But if you melee the sphere (not the barrel), the turret is likely to instantly point in a particular direction and freeze, in which case it also becomes non-solid, so you can now move through it. It's dead, if you like. Quite curious. In my experience the freeze usually happens on your first whack, but sometimes you need more. I'm not sure if that's to do with how you hit it or just something random, but I haven't noticed any pattern to it.
Moving and losing the turret
The turret can be moved around by pushing it with a Banshee. As long as you stay close, the turret won't fire - just like when pushing a manned Shade. But actually a better plan would be to first make it unaware of you (if needed) by briefly leaving the area as mentioned earlier. Then you won't have to worry about Banshee damage at all.
The turret doesn't move smoothly though. It continually bumps away as if the game is trying to keep it well separated. You get some light vibration feedback on some of these bumps, reminiscent of what it feels like when a needle expires on the Banshee.
It's not easy to control the movement, and also there's a significant danger. Namely, the turret can very easily get pushed through the ground or other surface, to disappear forever. It helps to be gentle with your pushing, but even then you may lose it.
One thing you might try is getting it up onto a rock. That's not easy but I've managed it with a low rock at least. The turret can also be pushed with a Ghost or Warthog, but that's much inferior to using a Banshee. In particular, a Ghost tends to go over the turret, which is just frustrating.
Bringing in the Marines
If there are still some Marines in the spiral path area, you can bring them forward to meet up with the turret - which may or may not see them to begin with (it can be unaware of them, just as it can with you). But although they seem to recognize it as hostile, shouting alert lines such as "Over here!", I've never seen them take any offensive action at all, and their movement patterns don't seem to take account of it. Basically they're just passive while potentially getting fired on - something you might like to try and arrange for entertainment.
Turret removal by the game
Beware that the turret can get removed by the game if you go through a loading point. Maybe I'll have better info on this later, in which case I'll update this section, but for now I'll say two things. Firstly, if you cross the loading point through the nearby door, expect the turret to vanish (because I can't recall a time when it didn't). Secondly, if you go back through the level and cross the previous loading point, maybe that's actually ok (because I've done that quite a bit and can't recall it vanishing).
Mid-air ramming and blasting
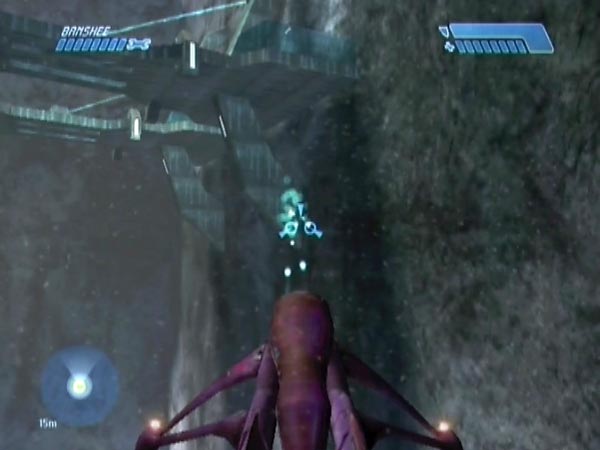
As I eventually realized, there's also some fun you can have with a detached turret even before it hits the ground. If you reboard in mid-air after flipping the ship, there can be time to ram the turret in mid-air! It takes a bit of practice to make good contact, but see what you can do with it. Ideally you'll want the turret to be heading away from the cliff after detachment. Other times it falls straight down the face, and in those cases it can be hard to even reach in time, let alone ram in an upwards direction.
I initially showed some of my ramming efforts in BCM124, but then in BCM126 I took things further, creating a much more favourable set-up for mid-air reboarding. The basic idea there is to initially be close to where you'll want to perform the reboarding - and facing an appropriate direction of course. With only a minimal flight needed to move into position, you should be able to nail that position more reliably, from try to try. It radically improved my success rate to as high as 50% when I was in the groove, allowing me to churn out detached turrets without much hardship (often taking only one or two tries), and thus get a lot more ramming done.
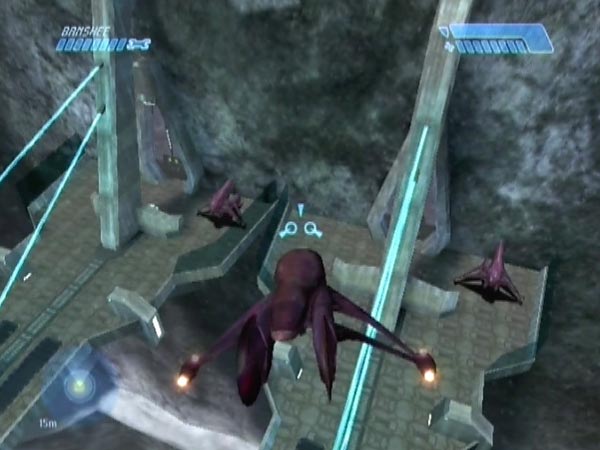
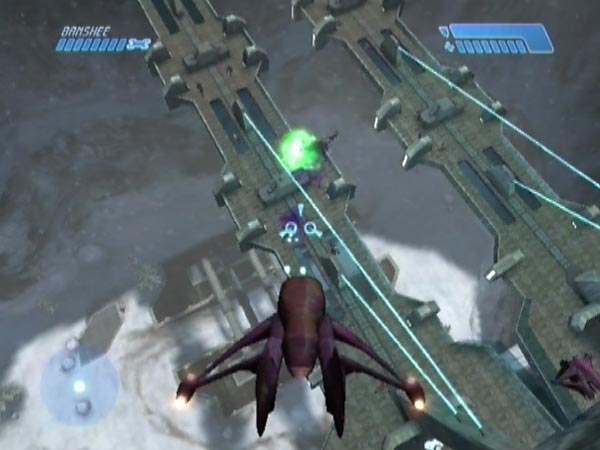
As for specific goals, for one thing you can knock it onto either of the bridges. Once there, I'd suggest getting a checkpoint so you can repeatedly play around with the turret. You can potentially have fun ramming it from under the deck - perhaps to send it flying off the bridge. Amusingly, the turret can shoot down through the deck, so watch out! If you try to push it along the deck, you'll find that it's very prone to falling through, so you have to be rather careful if you don't want to lose it.
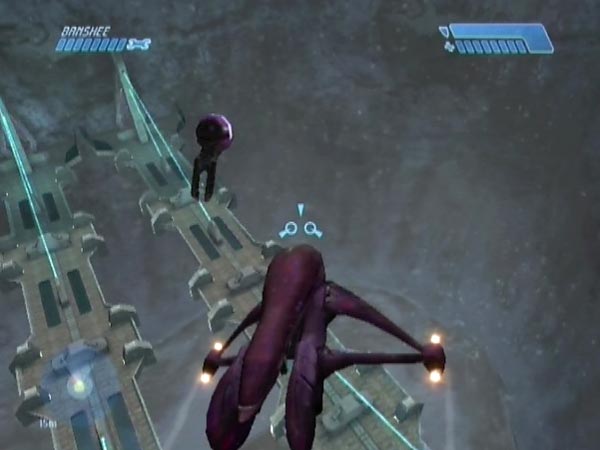
For another idea you could try to get it onto the upper ledge - something I managed in BCM126 (see pic), albeit in two stages. I can definitely recommend that as a challenging goal, which really brings the whole ramming business alive.
There's also the idea of keeping it in the air with repeated hits, though that would take serious practice I think. I haven't really put my mind to that yet, and to be honest I'm skeptical if I could keep it up for long (even after all the ramming practice I've had), but you can see the beginnings of the idea in BCM124.
Blasting
One other idea is to try and hit the turret with a Banshee blast in mid-air; possibly after ramming it, though that's not essential. But I must say, it's rather difficult to hit that thing at anything except short range. There's no targeting assistance - no red reticle. In my ramming efforts so far, I've often taken taken a shot at it afterwards (it's hard to resist), but I've scored very few good hits (my best one is in BCM126).
Incidentally, a blast won't impart any push, so it's not something you can use as a way of shunting the turret a greater distance. Pity!
Banshee pick-up
Remarkably, it's possible for the detached turret to lodge itself in your Banshee, effectively acquiring a new ride. It initially happened to me by chance while working on my turret ramming sequel BCM126, and you can see the original footage in BCM127.
To the best of my understanding, the dynamic here is that when you push the turret against a wall or corner, it potentially bumps inside the nose of the Banshee. Once inside, there's constant vibration feedback, like it's rattling around inside to some extent. And indeed, that may be exactly what it's doing, though the fit is quite tight. You'll also probably have felt vibration just before it bumped inside.
In fact, there was a time somewhat earlier when I'd noticed such vibration at a doorway corner, and made a note to check that out sometime as it seemed interesting. That's really what led to the discovery. It's why I was crowding the turret into a corner. But it was very fortunate that pick-up occurred so promptly. If it hadn't, it's quite likely that the phenomenon would've gone undiscovered for all time, because I probably wouldn't have bothered pushing it into a corner again.
Fragile lodging
The turret lodging is quite fragile though. If you try to fly forwards or freefall, the turret gets left behind; which is to say, it'll fall out. You can likewise lose it if you rotate too fast or bump into something.
For the most part, what this means is that you'll be needing to keep the left joystick back when airborne. As such, you can fly backwards, hover, ascend in a nose-down attitude, or descend in a nose-up attitude. Actually that's not the whole story, but I'll probably give more details later when I've explored more. The upshot is that you can't fly in your normal way. That's a pity, but nevertheless, pick-up gives you a way of moving the turret to new places if you wish.
More on technique
In the movie I was using a doorway corner area to perform pick-ups, but I expect various other places will be viable too; and I wouldn't be surprised if some are better than others. That's something else I've yet to explore, and I expect to expand this section in due course. There may also be some relatively controlled way of performing pick-up. At present the best average pick-up time I can manage is about two minutes, using a specially configured quick-revert method shown in BCM127.
When you see me driving the Banshee at the turret to try to achieve pick-up, what I'm trying to do is kind of rub over the top, rather than directly hitting it (which would likely just shunt it aside, or through the wall or floor). You should seek to make it jiggle around; seek vibration. Eventually you should get lucky and it'll end up aboard.
Turret behaviour after pick-up
It looks like the carried turret is unable to fire while you're aboard the Banshee. A pity, as I'd been hoping it might fire on some Marines while airborne. However, if you land and dismount, sometimes it stays aboard the Banshee but moves to a roof position (see pic), and it can then open fire. Other times it falls out. Sometimes it also bumps clear; possibly even below the ground, getting lost (you'd just see a red dot on your tracker for a while, as it falls through white void).
Note: If you pick up the turret when it's not aware of you, it has different behaviour in the Banshee. Rather than swivelling around, it basically seems to point down and back. If you fire the Banshee however, the turret becomes aware of you and returns to normal.
History and links
As far as I know, the detached turret phenomenon was discovered by BigGruntyThirst / BGT. In October 2006, Lone Starr filmed some video footage for him, advertising it in a forum thread at High Impact Halo. That was a brief co-op tutorial (though actually it omits the crucial point about flipping the dropship). Doing things in co-op is much easier than in single-player, as no survival is required. Basically all it needs is for one player to do the flip at the right time. The video is currently available in BGT's HIH video archive. Look for "The Dropship Turret" and use the first of the two video links.
In that HIH thread BGT explained how he'd found the dropship flip prompt while working on something else. He also gave a link to a 24-second video showing a bit of fooling around with a detached turret. That video is likewise available in the archive I mentioned; use the second video link.
In December 2009 BGT released a 38-second video in which he gets the turret detached and survives in quite a freaky fashion, reboarding his airborne Banshee near the bridge support. It's still available on YouTube, and to quote from his reply to my comment there: "Well I discovered the turret thing by accident ages ago, but never filmed it in single player. It's hard to survive. I was just messing around running into the dropship, then one time I fell out and noticed you could flip it. After a while I noticed the turret fell off if you timed it right."
In December 2013 KreativeKill released a video showing a few detachment attempts (which is what reminded me about this business, as mentioned in my intro), and shortly afterwards released a single-player tutorial.