Crazy-firing Grunts
Posted December 16th 2011
Associated movies
- Introduction
- Setting up
- Crazy-firing initiation and fun
- Going places
- Cavern gunners too
- Further remarks
Introduction
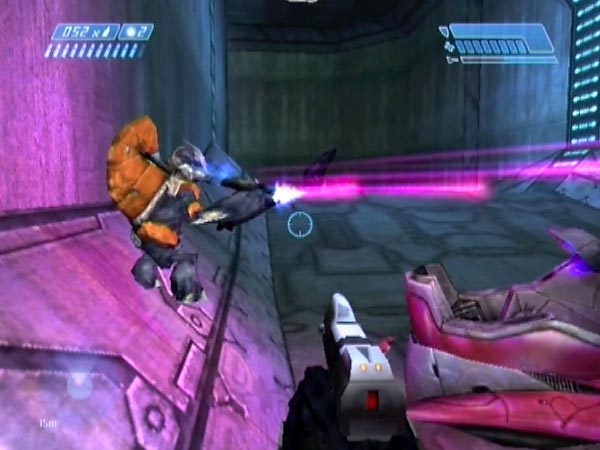
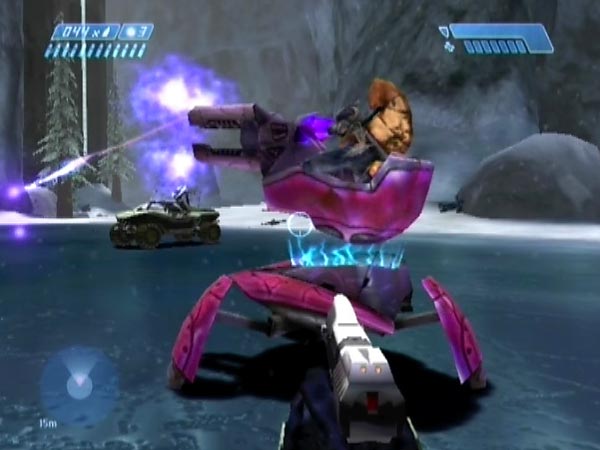
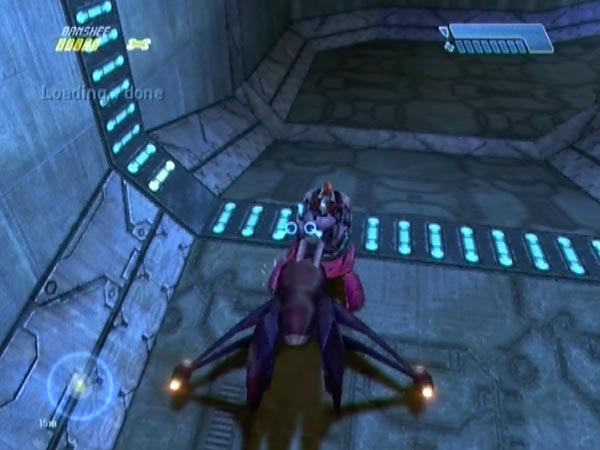
While messing about with a grunty Shade gunner last March (around the time I was doing my article Right behind you), I chanced across a striking phenomenon just beyond the loading point in the tunnel. The Grunt was firing his Shade non-stop at where I'd just been. It was like he was in some kind of shooting trance. He was oblivious to me (aside from saying things if I shot him or he shot me) and I could move around watching him - and even hop up on top of the Shade while he continued firing.
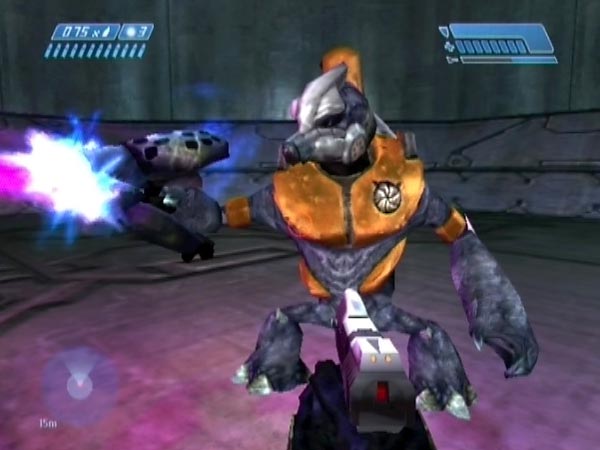
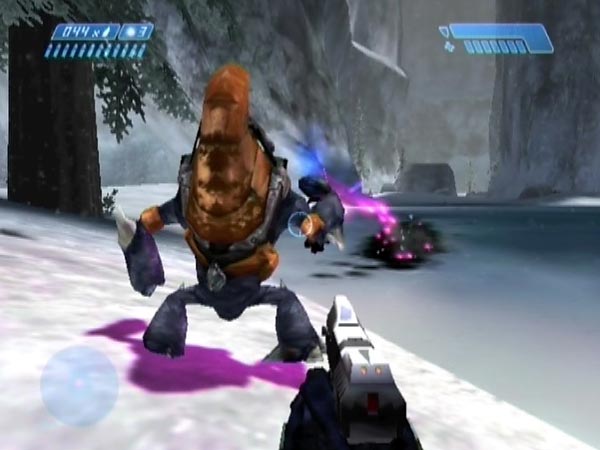
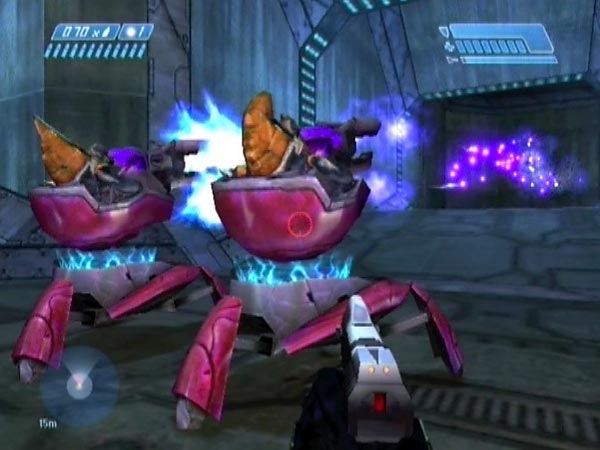
But that wasn't all. When I ejected him with a plasma grenade he started firing clip after clip of needles (reloading as usual). Not just your normal hesitant firing, but proper trigger-down streams. An impressive fella, even if he was shooting at nothing! The two pictures here show that original Grunt in action, before and after I'd ejected him.
Now much later, I've realized something rather interesting about that needling. The needling direction is actually guided by where the Shade is pointing, a live connection that continues even when you board the Shade and swivel it about! Weird. I'll talk more about that later, and the article will also cover a few other things such as moving your Grunt through the level and using other Grunts who instead have plasma pistols (which don't get fired non-stop but do get overcharged).
Setting up
Here's how to set things up with a handy checkpoint, after which you'll be able to get your Grunt crazy-firing. I suggest using Normal or higher. Most of my work on this used Heroic.
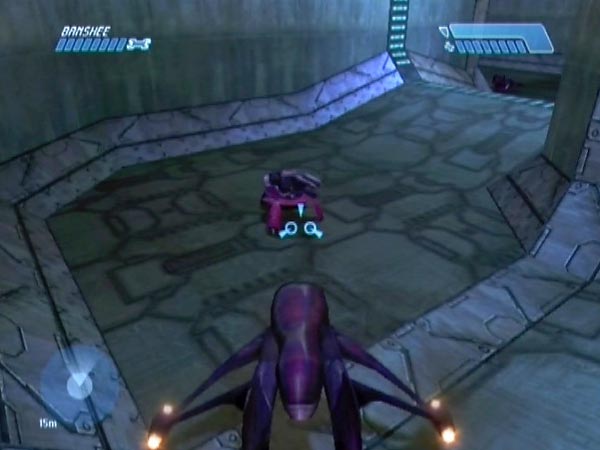
The initial work is much like that described in Right behind you, so I'll be brief with my description. Descend from the first bridge and fetch the twin bridges Banshee, then fly back to the start of the snow and use it to move the unmanned Shade through the level. Take it across the underground bridge and into the tunnel, and leave it near the middle of the tunnel's third corner area (the corner after the loading point), pointing back the way you came.
Fly back and resume normal play, getting the first ground battle triggered. It's ok to skip the indoor section if you want (you may as well, to save time). Now fly back to the Shade, whose needler wielding gunner spawned as part of the aforementioned battle. If you want, you can fly high to avoid triggering the crashed Pelican area, in which case the two-Wraith area will also not get triggered. At the cavern you might like to do some killing to reduce the danger to the Banshee both now and later on (I'm mainly thinking of the Elites), but it's not essential.
Ignoring the Shade for now, fly past and eliminate the enemy threat just beyond to make sure you won't get bothered later. But also, a checkpoint is triggered right after the loading point and it's good to keep it delayed. When not under threat by the enemies I mentioned, use Banshee fire to keep it delayed until you've flown back across the loading point and around the corner, ready to approach the Shade afresh.
However, if the checkpoint comes earlier than you wanted, that's no trouble. You can simply go back through the cavern to trigger a tunnel checkpoint and keep that delayed until in the aforementioned position. A third option is to use the dropship checkpoint triggered a short way up the rising part of the tunnel.
Note: Your Grunt may already have started crazy-firing when you flew past to kill enemies, but I'm assuming that didn't happen or that you nevertheless wanted to get a checkpoint as mentioned. He'd stop as you come back over the loading point.
Crazy-firing initiation and fun
To try and get the Grunt firing his Shade non-stop, approach the loading point in the middle of the dip and let him fire at you. If he's not very attentive as you approach, firing a shot might speed him into action. Cross the loading point while he's firing and there's a chance he'll continue, like his AI has got frozen into a state of wanting to fire. It's fickle and you may need multiple attempts, but probably not many; I got a success rate of over 25% when I tested on Heroic. You can just revert each time it fails. I think it helps if he's firing a shot just as the loading occurs - you'll quite often notice a frozen flash from the barrel when things work (as in BCM45) - but it's not easy to time things to try and get that. You could try though.
Although the crazy-firing Grunt is in a bit of a trance, seemingly fixated on where you were a while back, he's still breathing and can react with cries of pain if you shoot him (or the Shade). He'll also do a bit of taunting if his fire damages you. Something else you can do is jump onto the Shade's barrel to get shaken up and down as it vibrates - or just to get a novel view of the Grunt from above.
Time for some needling
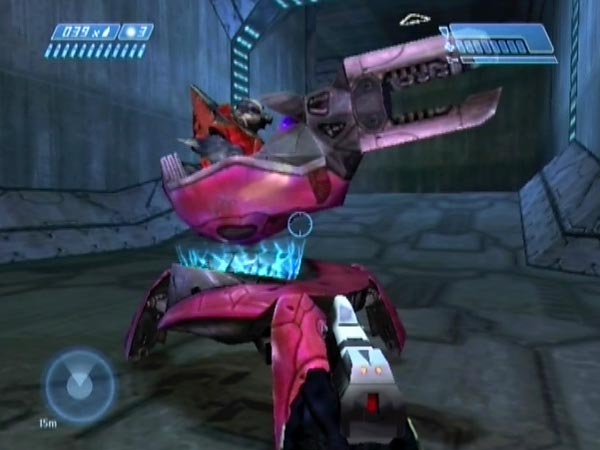
When you've had enough of watching him firing the Shade, get him ejected. You can do that with a well-placed Banshee blast or grenade blast, or you could push the Shade over (from the side) with the Banshee. He now starts firing clip after clip of needles (taking a while to reload each time), and again you can watch. But his needles probably won't be heading for the original target spot. In fact there's something pretty remarkable going on, which I only realized a few days into writing this article, when I happened to move the Shade and noticed his aim changing. The needling direction is interactively linked to where the Shade is pointing! He's got some weird connection with the thing.
The exact linkage is unclear - the needles definitely don't always go in the exact direction the Shade is pointing - but for starters if you blast the Shade around you'll see the needles spray about.
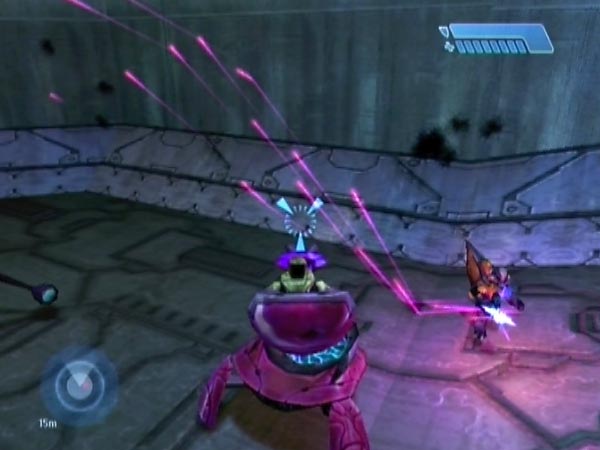
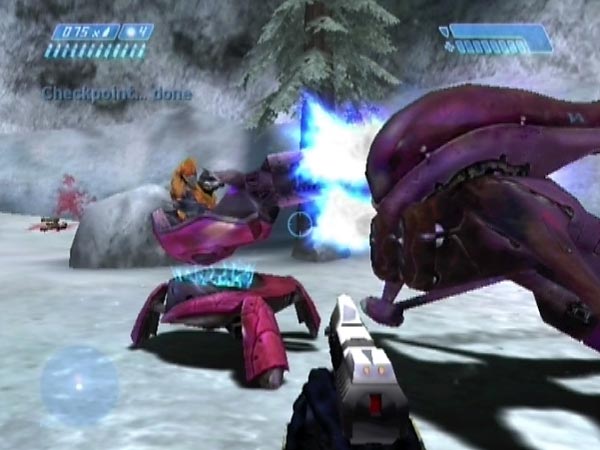
More usefully though, you can man the Shade and the link is still there! Point it where you like and the Grunt's aim will be affected, though not his stance or the needler itself (and consequently the needles will often look like they're emerging at a wacky angle). That's fun to play around with. One thing you can do is get the needles aimed so they ricochet off multiple surfaces. Another idea is to pan your aim around as he fires a stream, to get a wide arc of needles. If you want to move the Grunt to a particular place, nudge him gently with the Banshee's nose.
It's even possible to get the Grunt to needle himself if you make his aim go backwards and down so needles bounce up into his rear half (probably his foot but it's hard to see). He makes little cries of pain but the needles don't seem to cause as much damage as your own would. Testing one Grunt on Heroic, six of my needles would kill him, but with his own it was taking twice that or more.
Going back over the loading point
Note: If you go back across the loading point and your crazy-firing Grunt is still in that corner area, he'll stop firing. If he's on the Shade you can always restart him though, just like you started him the first time.
Checkpoint during crazy-fire
While your Grunt is crazy-firing in that corner area, it's nevertheless possible to get a checkpoint further through the level, and he'll still be crazy-firing when you get back. Potentially useful. Take a look at picture 4 on my page about other locations for Elite fireworks. My tests suggest that if you're past that line (part way up the tunnel's rise), the Shade's fire won't cause checkpoint delay; thus you can get a checkpoint beyond.
Going places
You can move a crazy-firing Grunt while he's on the Shade. Pushing with a Banshee is problematic because of the non-stop fire which you can only avoid at certain angles of pushing, but when you need to push against the direction of fire, a Warthog can be used instead. You could push head-on, and each time you're about to start taking health damage you can dismount to recharge, but it's easier and faster to push diagonally, tacking left and right. The Scorpion can be used too, but I prefer a hog as its lower profile tends to intercept less fire.
Starting from the 'handy checkpoint', here's the sequence of events I'd suggest if you want to take the Shade somewhere (as seen in BCM46). Fly past the Grunt and switch to a Ghost, then drive back to the hog and switch to that. Return and switch to the Banshee, then get him crazy-firing in the usual way, getting a new handy checkpoint first if you want (e.g. trigger and delay the dropship checkpoint). Then get pushing. You can push him to the next corner with the Banshee (his fire will be safely heading past you), then start using the hog.
Pushing with the hog requires patience and a delicate touch, especially up the tunnel's rise, but it's not that hard. Later you'll sometimes be able to use a Banshee again, which is easier than using a hog. When you get where you want, you can eject him if desired.
Clear the way of enemies or your Grunt could get damaged. Marines must die too or they'll attack him. Here's a tip relating to enemies. After triggering the dropship which lands at the tunnel exit, get back over the loading point promptly and remain past it for a while; 20 seconds should do. Dropship enemies will fail to spawn, which will save you some killing. I didn't bother to do this in BCM46 though, as it would've been an extra complication to explain, plus it was more fun to show some killing!
Consolidating progress
The continual Shade fire normally delays checkpoints, but not if you get suitably well clear (or are already suitably well clear when it's triggered). Getting checkpoints as you go along is worth it to consolidate progress, in case you make a mistake such as accidentally toppling the Shade while pushing (the Grunt won't get back in). Various checkpoints can be exploited along the way, but here's another option. As long as the Shade has been moved at least as far as the fourth corner area in the tunnel, you can go back for a tunnel checkpoint and the Grunt should still be firing on your return. You can delay the checkpoint until closer to the Shade. If the Shade is in the rising part of the tunnel or beyond, you can end the delay in the third corner.
Rather usefully, it's also possible to end a checkpoint delay at the firing Shade, by briefly moving a vehicle in front of the barrel to make the air free of plasma for a moment, giving the game a chance to issue the checkpoint. This is especially useful if you want to try something tricky right afterwards, which may take multiple goes. Often the Shade's fire is low enough that a hog can be used, but a Banshee blocks better. Avoid being in it, so it won't take damage. You can let it glide into position, and if it's not quite right you can do some nudging (Shade or Banshee) until successful. It's a pity I didn't show this blocking method in BCM46 but I hadn't tested it much at that point, and had half forgotten about it. It's easier than I originally thought. You can do similar to end a checkpoint delay if the Grunt is needling.
Who stole my Grunt?
Warning: Once the Grunt is out of the Shade (significantly deeper into the level), it's risky to go back over the loading point to get a tunnel checkpoint or whatever, because the game may remove him. I talked about that in my article on Grunt fireworks; see the end of the section on Setting up with no bridge descent. So try to use other checkpoints instead.
Cavern gunners too
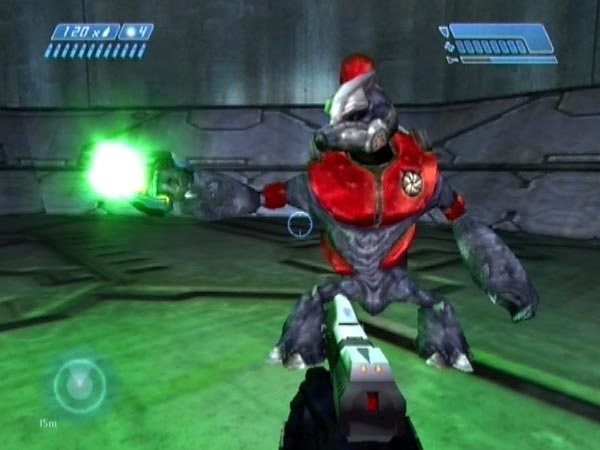
Instead of using that early Grunt you could use a gunner from the cavern, though he'll be armed with a plasma pistol rather than a needler, and when you eject him from his crazy-firing he won't fire with it. Instead you get another novelty. He overcharges it and keeps it that way, glowing and humming. Nice green light! If you shoot him he'll release the shot. If he's not killed, the shot direction is related to the Shade direction (presumably in the same way as with the needler) and he'll quickly overcharge again.
You can set things up by placing one of the cavern Shades in that third tunnel corner in advance. A gunner will be running to it when you arrive at the cavern later. Give him time to get there, and the rest of the set-up work will be the same as before, killing enemies beyond and getting a handy checkpoint before making attempts at getting him crazy-firing.
Alternatively you could set things up without placing the Shade in advance (and thus not needing a bridge descent), as follows.
Play through the level in standard fashion until able to steal the platform Banshee and take to the air. At the cavern, kill most or all enemies aside from the Shade gunner you want; presumably the one nearest the exit door. Use the Banshee to push the manned Shade to the required position (for tips see Setting up with no bridge descent in my article on Grunt fireworks), then continue in the usual manner, killing enemies beyond and getting the usual handy checkpoint back around the corner. Actually you could take care of that killing before moving the Shade into position if you prefer.
That late pushing method can doubtless also be used with gunners from even earlier in the level.
Further remarks
Difficulty levels
My main work on this stuff has been on Heroic. I wondered if it might be easier to get a Grunt crazy-firing on Legendary, due to his more aggressive tendencies, but I tried it and didn't notice any improvement. I haven't tried Normal or Easy, but I suspect that on Easy it might take frustratingly long to get the Grunt crazy-firing because of his hesitance to fire. Another thing about Easy is that there's less margin for error when trying to eject a Grunt with a blast, as he's so weak. However, you can always push the Shade over instead.
Multiple crazy-firers
You can have multiple crazy-firing Grunts! In a preliminary experiment I got two cavern Grunts crazy-firing their Shades, though it took quite a few attempts to get them started. Next step: get three firing together!
Shade position and Grunt behaviour
In the set-up work I said to put the Shade near the middle of the tunnel's third corner area. Obviously there's some variation possible, but a key consideration seems to be the distance between yourself and the Shade when you cross the loading point. If the distance is too low, what often happens is that the Grunt maintains standard active behaviour rather than doing crazy-firing or going passive. Specifically, you tend to get that if the front of the Shade is within about two metres of the metal ground-strip just before the corner area. You might still get crazy-firing, but it's likely to be rarer. So, it's best to have the Shade further back. Aside from that consideration, I think anywhere in the corner area will do.
Banshee preservation
If you want to keep Banshee damage down in the set-up work, that's no trouble. At the cavern you can dismount to kill the first two Elites on foot (using a stealthy tag for openers perhaps), and can then fly in to kill the other two from a safe distance before flying into the tunnel. You can leave the Banshee back around the corner from the Shade and advance on foot to make things safe. Use jumping to maintain the checkpoint delay when not under threat. Return and board the Banshee, then get the delayed checkpoint.
Making attempts to get crazy-firing
It's not essential to get a handy checkpoint prior to trying to make a Grunt crazy-fire. When an attempt fails, you can always just fly back over the loading point for another go. But that's slower and your Banshee would get progressively worse for wear through taking occasional hits. Even if you're not fussed about having a checkpoint, it's a good idea to've first triggered the checkpoint you get after crossing the loading point, to get it out of the way.
When an attempt fails, the Grunt is simply passive (and the game doesn't consider him a threat to you, because his presence isn't enough to keep a checkpoint delayed). He remains passive when ejected.
Using the second corner
If you instead place the Shade in the middle of the tunnel's second corner, it's again possible to get the Grunt crazy-firing by going forward over the loading point while he's firing (you'd be flying away from him). However, this situation isn't so good because if you come back over the loading point to get closer, he'll stop (returning to normal).
Gunners from beyond the tunnel
How about using Shade gunners from beyond the tunnel? I've checked, and yes it's possible to get such a gunner crazy-firing as you come back over the loading point, if you set things up right (the Shade would be placed somewhere back over the loading point). But I'll leave the details for later when I've explored more.