Standard Shade ride method
Associated movies
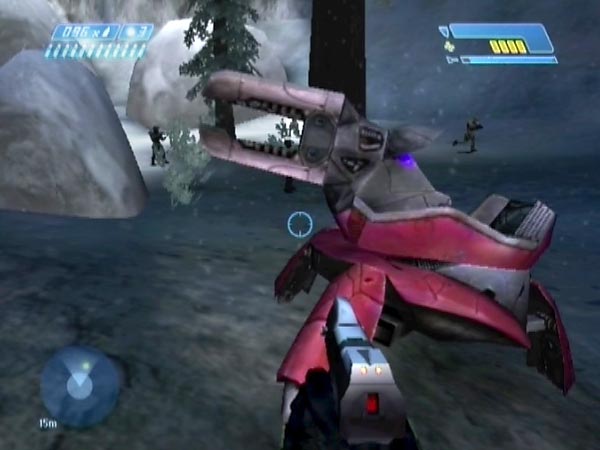
In this method you blast the near right Shade off the bridge and board it just as it's going off the edge, either riding it all the way down with a bounce at the ledge, or just riding it down as far as the ledge then getting down from there. Suitable for PAL, problematic for NTSC/PC.
Full description for the general plan
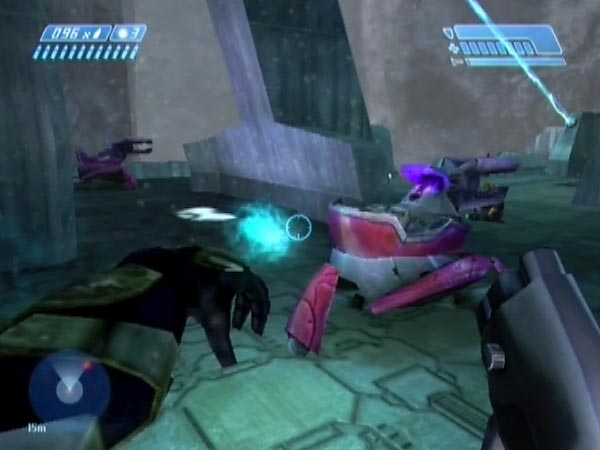
Throw a grenade to the left of the near right Shade so it gets blown sideways off the bridge but slightly angled towards the cliff, so it's likely to hit the ledge on the way down while avoiding the cliff face. Either type of grenade can be used, but a plasma will probably give you the best control. You may find it convenient to be standing on the rim of the bridge when making your throw, initially with your back against the wall, and in that case I'd suggest aiming a plasma grenade something like as seen in the picture. But I'll say more on grenade aiming later.
Board the Shade just as it's sailing over the edge. To do that you'll need to hit X to flip it when you see "Press X to flip gun turret", then quickly hit X again to board it when you see "Press X to enter gunner seat of gun turret". This is best done from on top of the rim of the bridge, standing just clear of the expected path of the Shade. That's why I suggested standing on the rim for your throw.
The button work can feel a bit tricky to begin with, but keep in mind that it doesn't need to be frantic, and that you shouldn't press X before getting the relevant onscreen message else the press will just be ignored. When you've become used to it and got the timing sorted, boarding is a pretty relaxed affair. So relaxed that you may still be clambering aboard when the Shade is already quite a way down.
On the way down there's a considerable danger of grazing the upper part of the cliff, in which case you'd probably get ejected from your ride, but let's assume you either avoid such grazing (probably thanks to good grenade placement plus a bit of luck) or at least remain seated.
You may take damage when the Shade hits the ledge, and you could even be killed; it depends on how and where the Shade hits. You'll typically be hitting the stretch of ledge along the chevron feature, and ideally you'd want to hit the friendly slope of the chevron itself, to judge from my inspection of video footage. Even so, losing four health bars is common.
If you bounce off the ledge still aboard the Shade, there's a good chance you'll survive the subsequent ground impact with no further health loss. The danger mainly lies in landing on your head; but even then, you usually survive if you're only hitting snow. In such a case the third-person camera is likely to briefly dip below the surface, giving you a glitchy view from below the ground. However, there's a nasty rock to contend with. Hitting the rock upside down is most definitely a bad thing.
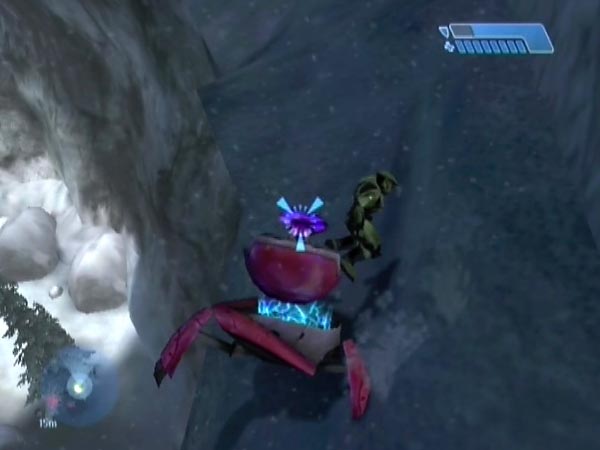
If you're jolted out at the ledge (which seems rare) or you deliberately dismount beforehand, you can end up alive on the ledge, from where you can get down as described elsewhere. I'm treating those possibilities as variations of the method. If the Shade misses the ledge however, you'll die in mid-air before reaching the ground.
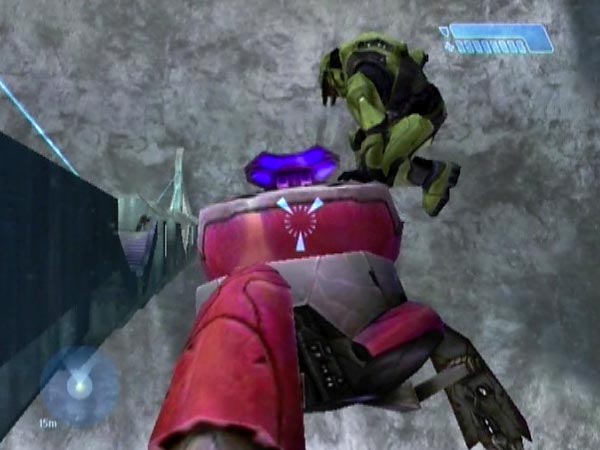
For dismounting you'll need to be facing in an appropriate direction, bearing in mind that you'll dismount to your right. You also need to time things right. I suggest trying to be stepping clear of the seat just as the Shade hits the ledge (see later pic). It's possible to dismount without any damage at all.
Going back to the matter of boarding, I said it's best to stand on the rim and be clear of the Shade's path. Here's my explanation about that. Being on the rim lets you do the flip later than otherwise, which I think is a good thing. It reduces any chance of the Shade's legs catching on the rim and helps the Shade get enough distance to strike a favourable part of the ledge - namely along the chevron feature. As for being clear of the path, let's suppose you're on the rim but in the path. In that case you'll need to do the flip before the Shade collides with you, or you'll be killed. That's easy enough, but it means you're doing the flip rather early; a possibly bad thing as already explained.
Refined grenading for better results
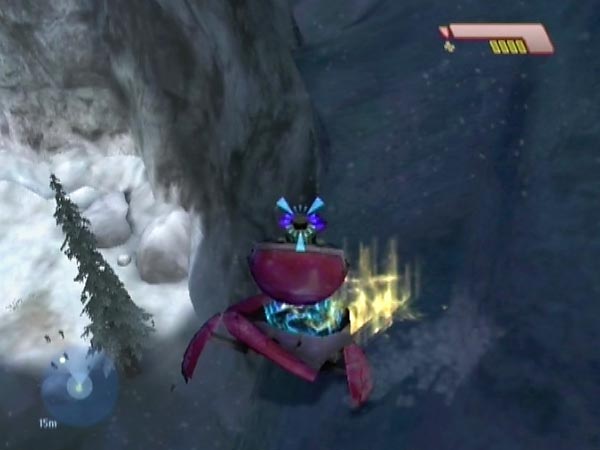
So far I've described the general plan, but grenade placement is obviously a critical aspect of getting any sort of reliability. You might like to experiment to try and get things working as well as you can - or you can just use some suggestions I've got. The first picture on this page shows one fairly good aiming method for a plasma grenade. I'm standing on the rim with my back to the wall, and I'll need to subsequently move forward slightly for the flip and board. That way of doing things has been a standard one for me, giving a success rate of around 50%, but a drawback is that you rarely get down with full health. Usually the ledge bounce takes away four health bars - if it doesn't kill you that is.
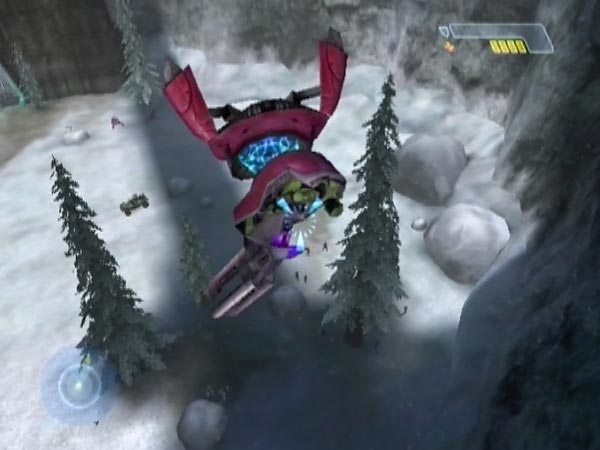
Dissatisfied with that, I later came up with an improvement, shown towards the end of BCM173. The aiming for the plasma throw is seen in the picture here; and then you promptly hop onto the rim, ready to do the flip and board. The Shade tends to hit the ledge more nicely, so you rarely lose health on the bounce. Also, you usually miss the nasty rock down below. The success rate seems a little higher - I've managed 62% over 50 tries - but the best thing is that when you succeed, you usually do so with full health, instead of only half health. So, that's my best recommendation for the grenading.
You'll find that you fatally graze the cliff quite a bit. I tried different aims to see if I could reduce that trouble without compromising the nice ledge hit, but had to give up. It may be unattainable. In order to hit the ledge at all, you have to sail quite close to the cliff face; and bear in mind that your Shade flip introduces significant randomness into the Shade's trajectory. So it's not surprising that cliff grazing is hard to avoid.
Some variations
I've been speaking of the near right Shade as that's the one which was originally used and is most convenient, but actually you can use either of the two far Shades in similar fashion, so I classify those options as variations of this descent method. The near left Shade is different though. It's hard to make it sail down towards the ledge because of the top of the V sticking out. With some very careful grenade placement you can avoid the V, but I found that I always died just before the Shade hit the edge of the ledge (and that was with PAL, in which you can fall furthest without dying). There are separate methods using that Shade though, by taking advantage of the V. See the V-start Shade ride method and the V-clip Shade ride method.
As another variation of the method, you don't have to use a Shade where it stands. With melee and grenades you can move a Shade to any position you like and try riding from there if you want. You can even move it to the lower deck. I doubt you'll find any of this Shade moving worth the effort, but it's an option.
Checkpoint advice
To make things as easy as possible for repeat attempts, get a delayed checkpoint when ready to throw your grenade. Alternatively, bearing in mind the high success rate you can get when experienced, it would be reasonable to get a checkpoint just before you come through the door.
Difficulty and system differences
For PAL this is an excellent method. Relatively easy, as long as you can get the hang of boarding the Shade as it flies past. With my latest grenading routine I get about a 60% success rate. And incidentally, things also seem fairly easy with the two far Shades - not that you're likely to be interested in those.
As for NTSC, it looks like riding the Shade all the way to the ground may be impossible. Mike Miller certainly thought so. But it is possible - though problematic - to end up on the ledge, one such partial descent being shown in his Legend 2 video (see the 'History and links' section below). He's jolted out after grazing the cliff. In a High Impact Halo forum thread he commented "As far as I can tell, it was pure luck...I have no idea what kept me alive that time when the impact killed me every other time I made it that far in about 1-2 hours of attempts". However, I suspect it was the graze against the cliff that made the difference; and he was indeed lucky with that, because grazing almost always causes ejection. From that thread it's not clear whether dying in mid-air before reaching the ledge is a problem, but I suspect so.
At present I have no information on how things may differ for PC, but I expect it's similar to NTSC.
I'm wondering if any NTSC/PC user has tried using a Shade which has been moved to the lower deck. From the lower deck you're not going to have as far to fall before hitting the ledge, so maybe it's possible to bounce off the ledge and reach the ground without dying?
History and links
This method originates with Juggertrout, earlier known as HighAsAKite. His first footage of it was in Halo Trickery (now listed in his video archive at High Impact Halo) which was advertised in the HBO forum on April 3rd 2004, but apparently he'd managed the trick much earlier, explaining that "I originally did this after some one told me that FrogBlast used a shade to get to the bottom of the bridge. I did this about a year ago and sent it to OXM and documented it on various sites. I was only now able to make a movie of it". It starts at 0:46 and he rides the near right Shade all the way down, taking damage when it bounces off the ledge. Another example occurs at 0:30 in his later video Things to do on the first AotCR bridge when you're bored, which was advertised in the High Impact Halo forum on June 17th 2005. This time he gets a nice gentle bounce off the ledge, causing no damage at all. His video Tribute to Assault on the Control Room, which was advertised August 19th 2007, includes using the method on both sides of the far end of the bridge at 1:03, as well as riding the usual Shade.
I'm not sure if Juggertrout ever showed a video in which he only sailed down as far as the ledge (something I've treated as just a variant of the same trick), but Mike Miller is jolted out at the ledge when he does the trick at 3:46 in his Legend 2 video (see the HBO news item here from September 8th 2004), and in the acknowledgements he lists "Juggertrout, for the shade trick". I was interested to see him standing in the path of the Shade before boarding it. That looked pretty dangerous! I subsequently tried it myself and realized that by doing the flip you got temporary protection from being killed, so it wasn't that dangerous if you got your timing right. But it's still not something I'd recommend (see earlier talk about boarding).
The trick also appears in domdunc's 2004 video Climbing down from the AotCR bridge in a shade, in which he dismounts from the Shade onto the ledge just before it strikes a glancing blow. The landing sets his shield bleeping but there's no health damage. Another appearance is at 0:24 in Ms. Man's video I Don't Remember This Being Here (also available on YouTube in blurrier form). He dismount from the Shade before it hits the ledge, and ends up on the ledge without even taking any shield damage.
You can see the method demonstrated in two forms at the start of BCM33. First there's a standard ride all the way to the ground, with a spot of gratuitous Grunt tagging on the bridge for extra entertainment, then I manage the dismount variation with no damage at all (starts at 0:53). I also do a Shade ride at the start of BCM40, landing on top of a rock, and one at the start of BCM48.
In regard to the Shades at the far end, I've already mentioned Juggertrout's 2007 video which uses both. But there was also an illustrated forum thread in June 2004 showing 3rd Person (aka WLT) descending from the right side of the lower deck at the far end (something I'd tried for myself by the time I found that thread; and the left side is ok too).